Day One: Introduction to Bash
This lesson is adapted from The Unix Shell lesson of Software Carpentry.
- Traversing the Filesystem
- Where Are You?
pwd, cd, ls - Anatomy of a Bash Command: Command, Options, Arguments
- File and Folder Manipulation:
mkdir, nano, mv, cp, rm - Wildcards:
*, ? - Processing Files with
wcandcat - Writing Output to Files:
>and>> - Filtering Output with
sort,head, andtail - Accumulating Text:
>>andecho - Pipelines: The Magic of
| - Today’s Bash Command List
- Learn More About Bash
Traversing the Filesystem
The part of the operating system responsible for managing files and directories is called the filesystem.
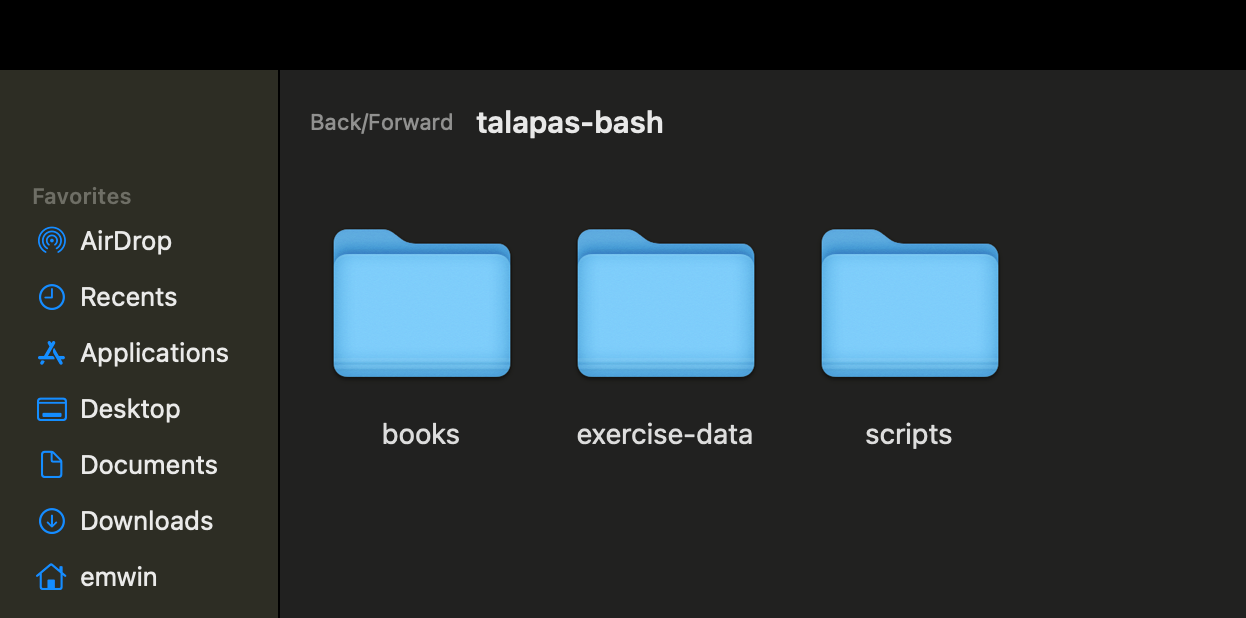 A screenshot of a folder as it appears in the Finder GUI.
You have probably interacted with your device’s filesystem through GUI or graphical user interface applications like Finder (MacOS) or File Explorer (Windows).
 A screenshot of the same folder contents as they appear from the command line.
To work with high performance-computing systems like Talapas, you will need to interact with files and folders from a shell application called the command line, command prompt, or terminal. The language we will use to communicate with this shell application is called Bash. To work with high performance-computing systems like Talapas, you will need to interact with files and folders from a shell application called the command line, command prompt, or terminal. The language we will use to communicate with this shell application is called Bash.
Today’s Bash commands are used to create, manage, rename, and delete files and directories. A robust understanding of filesystems and systematic file management is essential for high-performance computing.
Navigate to the terminal you opened during Setup.
Where Are You? pwd, cd, ls
Today, we will focus on running Bash commands locally on your own device. In our next lesson, we will run these commands (and a few new ones) on a remote cluster. Today, we will focus on running Bash commands locally on your own device. In our next lesson, we will run these commands (and a few new ones) on a remote cluster.
Entering Bash Commands
Bash commands can be intimidatingly terse for new programmers. You will gradually commit more commands to memory as you practice, and this lessons includes a “cheat sheet” of covered commands. Bash commands can be intimidatingly terse for new programmers. You will gradually commit more commands to memory as you practice, and this lessons includes a “cheat sheet” of covered commands.
To run a Bash command, type the command precisely, then press the Enter key. To run a Bash command, type the command precisely, then press the Enter key.
Where You Are: pwd
Our first Bash command is pwd, which stands for print working directory.
pwd
Because many terminal applications open to your home directory by default, the expected output is the absolute path of your home directory, which will vary based on your operating system and your account name. Because many terminal applications open to your home directory by default, the expected output is the absolute path of your home directory, which will vary based on your operating system and your account name.
/Users/emwin
/Users/emwin
This command returns the absolute path of the current working directory. All relative file and folder paths used as arguments must be relative to the current working directory.
If you enter PWD instead, the command will not be recognized. All Bash commands are case sensitive.
PWD
PWD: command not found
If you enter PWD instead, the command will not be recognized. All Bash commands are case sensitive.
PWD
PWD: command not found
Home Directory Structure
Each of you has a different set of files and folders inside your home directory, which means that you will get different results when running the same commands. Each of you has a different set of files and folders inside your home directory, which means that you will get different results when running the same commands.
We’re going to practice Bash commands from inside the talapas-bash folder you extracted from talapas-bash.zip. We’re going to practice Bash commands from inside the talapas-bash folder you extracted from talapas-bash.zip.
You should have a folder /users/home/[YOURNAME]/talapas-bash/ (Mac OS or Linux) or /c/users/Home/[YOURNAME]/talapas-bash/(Git Bash) with a set of practice subfolders and files.
Please ask for assistance now if you need help moving and extracting thetalapas-bash.zip file. You should have a folder /users/home/[YOURNAME]/talapas-bash/ (Mac OS or Linux) or /c/users/Home/[YOURNAME]/talapas-bash/(Git Bash) with a set of practice subfolders and files.
Please ask for assistance now if you need help moving and extracting thetalapas-bash.zip file.
Changing the Current Working Directory: cd
Change your working directory to talapas-bash using the cd command. cd takes in a single argument, the directory to move to. You can use either absolute or relative paths, but the relative paths must be relative to the current working directory. Change your working directory to talapas-bash using the cd command. cd takes in a single argument, the directory to move to. You can use either absolute or relative paths, but the relative paths must be relative to the current working directory.
cd talapas-bash
Confirm that you are inside the talapas-bash directory by running the pwd command again.
pwd
/Users/emwin/talapas-bash
Using cd without an argument will take you back to your home directory.
cd
/Users/emwin
Listing “Stuff” With ls
This begs the question: what files and folders are here?
Inspect the contents and their respective using ls. The ls command stands for list directory contents.
ls
books exercise-data scripts
ls is also the first command that we will use with options.
Options or flags are letters signaled by a hyphen that are passed to commands to change the behavior of that command.
Type ls -l with a - (hyphen) key. Options must come after the command they modify and without space between the hyphen and the letter representing the option.
ls -l
drwxr-xr-x  5 emwin  staff  160 Feb  3  2025 books
drwxr-xr-x  8 emwin  staff  256 Feb  3  2025 exercise-data
drwxr-xr-x  3 emwin  staff   96 Feb  3  2025 scripts
The -l option enables “long-listing” format. We’ll come back to what each column in this new listing format means later when discussing permissions.
We should still be in the talapas-bash directory, which we can check using:
pwd
/Users/emwin/talapas-bash
Let’s explore this folder of examples more. Next, we’ll move to the talapas-bash/exercise-data directory and see what it contains.
Auto-Complete with Bash
For lengthy filepaths, the shell can infer file and folder names through auto-completion. This is a great feature for traversing long or complicated file paths! Type cd exer and Tab and the shell will automatically complete it to exercise-data.
cd exercise-data
ls -l
total 8
drwxr-xr-x  9 emwin  staff  288 Feb  3  2025 alkanes
drwxr-xr-x  3 emwin  staff   96 Feb  3  2025 animal-counts
drwxr-xr-x  5 emwin  staff  160 Feb  3  2025 creatures
drwxr-xr-x  7 emwin  staff  224 Feb  3  2025 mice
-rw-r--r--  1 emwin  staff   18 Feb  3  2025 numbers.txt
drwxr-xr-x  4 emwin  staff  128 Feb  3  2025 writing
You can enable multiple options simultaneously by putting both letters after the hyphen.
Here, the h option stands for “human-readable” and prints file sizes in KB, MB, and GB rather than in bytes for readability.
ls -lh
total 8
drwxr-xr-x  9 emwin  staff   288B Feb  3  2025 alkanes
drwxr-xr-x  3 emwin  staff    96B Feb  3  2025 animal-counts
drwxr-xr-x  5 emwin  staff   160B Feb  3  2025 creatures
drwxr-xr-x  7 emwin  staff   224B Feb  3  2025 mice
-rw-r--r--  1 emwin  staff    18B Feb  3  2025 numbers.txt
drwxr-xr-x  4 emwin  staff   128B Feb  3  2025 writing
Order among options does not matter when enabling multiple options.
ls -hl
total 8
drwxr-xr-x  9 emwin  staff   288B Feb  3  2025 alkanes
drwxr-xr-x  3 emwin  staff    96B Feb  3  2025 animal-counts
drwxr-xr-x  5 emwin  staff   160B Feb  3  2025 creatures
drwxr-xr-x  7 emwin  staff   224B Feb  3  2025 mice
-rw-r--r--  1 emwin  staff    18B Feb  3  2025 numbers.txt
drwxr-xr-x  4 emwin  staff   128B Feb  3  2025 writing
However, options are case-sensitive. For example, let’s try ls -F and ls -f.
ls -F
alkanes/ animal-counts/ creatures/ mice/ numbers.txt writing/
The -F option tells ls to add a marker to file and directory names to indicate what they are:
- a trailing
/indicates that this is a directory @indicates a link*indicates an executable
This can be extremely informative. (Windows: You may already see these markings by default in Git Bash.)
The -f option, however, tells ls to remove any color-coding and to show all hidden file and folders. Hidden files begin with the . symbol.
ls -f
.		alkanes		creatures
..		animal-counts	writing
numbers.txt	mice
If you try to use an option that is not supported, Bash commands will print an error message similar to:
ls -j
ls: invalid option -- j
usage: ls [-@ABCFGHILOPRSTUWXabcdefghiklmnopqrstuvwxy1%,] [--color=when] [-D format] [file ...]
Anatomy of a Bash Command: Command, Options, Arguments
Let’s formalize some terminology by looking at an example Bash command:
ls -F /
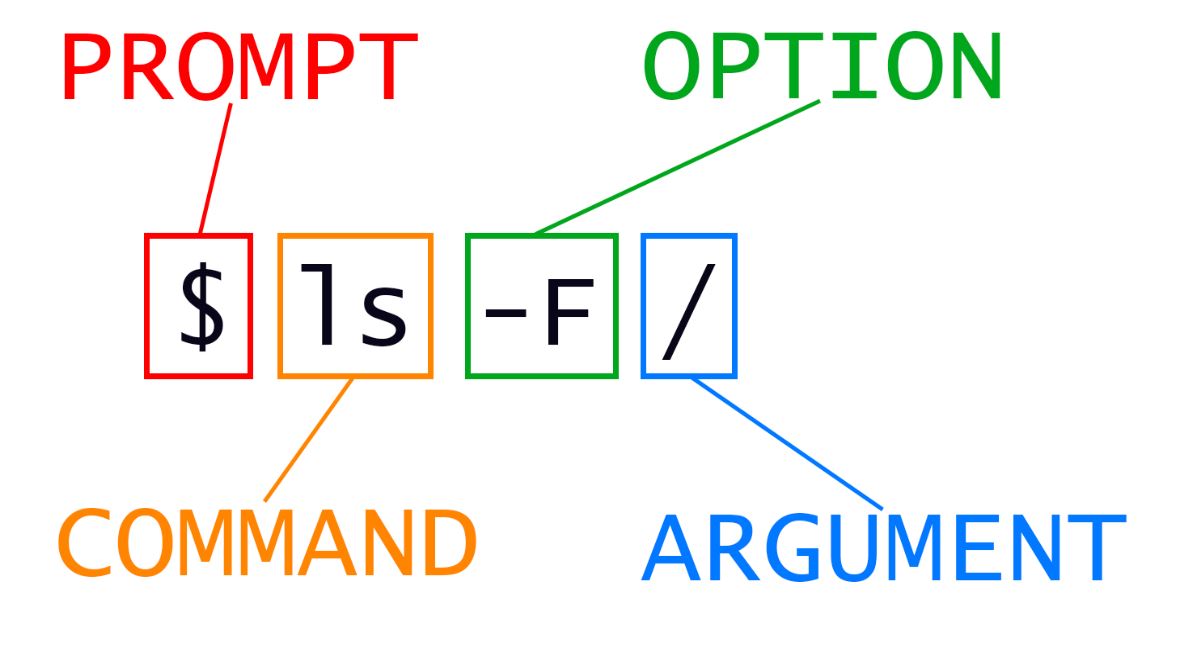
In the example ls is the command, as run with an option -F (type indicator flag) and an argument / (the root directory).
There are two types of options: single dash - options or short options, and two dashes -- options or long options.
A command can be called with more than one option and more than one argument, but a command doesn’t always require an argument or an option. For example, the pwd command never takes an argument.
You might sometimes see options being referred to as switches or flags, especially for options that take no argument.
Each part of the command is separated by spaces. If you omit the space between ls and -F the shell will look for a command called ls-F, which doesn’t exist.
When ls is used without an argument, it displays the files and folders in the current working directory.
When it is used with an argument, it displays the files and folders in that directory.
In this case, ls -F will display all the files at the root directory /.
Quiz
What happens if we try to
cd exercise-datafrom here? Why?
Answer
The command will fail with the following error because there is no
exercise-datadirectory insideexercise-dataand we supplied a relative path.bash: cd: exercise-data: No such file or directory
File and Folder Manipulation: mkdir, nano, mv, cp, rm
Special Characters: ~, .. and .
With our methods so far, cd can only see sub-directories inside your current directory.
However, there is a shortcut in the shell to move up one directory level without resorting to absolute paths from root. It works as follows:
cd ..
.. is a special directory, the parent of the current directory. Sure enough, if we run pwd after running cd .., we’re back in talapas-bash:
$ pwd
/Users/emwin/talapas-bash
The special directory .. doesn’t usually show up when we run ls. If we want to display it, we can add the -a option to ls -F:
ls -Fa
./ ../ books/ exercise-data/ scripts/
It also displays another special directory . that points to the current working directory. It may seem redundant to have a folder refer to itself, but it will become useful as we learn more commands.
Quiz
From your current working directory of
writing, how could use..andlsto see the contents of themicedirectory? Hint: themicedirectory path istalapas-bash/exercise-data/mice.
Answer
Use
ls ../miceto look for a directory calledmicefrom insideexercise-data.ls ../miceAnimals.txt citation.txt README.md Tasks.txt Visit.txt
Finally, let’s discuss a third special character: ~. This is shorthand for the absolute path if your home directory and it works regardless of your operating system.
ls ~
Pictures
Movies
...
Quiz
How would I navigate to talapas-bash using a relative path? How about a path using
~again?
Answer
cd talapas-bash, andcd ~/talapas-bashrespectively
More Complex Traversals
We don’t have to traverse through the filesystem one folder at a time!
When using auto-complete, if you press Tab and no paths populate, it means there’s more than one possible path with the current prefix. Because exercise-data/ has multiple files and subfolders inside, the shell can’t decide path which to populate. Press Tab twice to see all the possibilities.
Now, type a single w for writing and press the Tab key a final time. Then, run the full command.
cd exercise-data/writing/
Creating Directories with mkdir
Inside writing, let’s create a new empty directory called thesis using the command mkdir thesis.
mkdir thesis
mkdir means ‘make directory’. Since thesis is a relative path, the new directory is created in the current working directory:
ls -F
haiku.txt LittleWomen.txt thesis/
Note that the mkdir command will silently return without prompting you if it creates the file successfully. It only prints a response to the terminal if it fails.
For example, if you try to create a directory that already exists, mkdir will return an error.
mkdir mice
mkdir: mice: File exists
Since we’ve just created the thesis directory, there’s nothing in it yet. We can check this by passing in thesis as an argument to ls.
ls -F thesis
Note that mkdir is not limited to creating single directories one at a time. The -p option allows mkdir to create nested subdirectories in a single operation. This command creates a project directory with two subfolders: data and results.
mkdir -p ../project/data ../project/results
The -R option to the ls command will list all nested subdirectories within a directory.
Let’s use ls -FR to recursively list the new directory hierarchy we just created in the project directory:
ls -FR ../project
../project/:
data/  results/

../project/data:

../project/results:
A Beginner-Friendly Text Editor: nano
Let’s change our working directory to thesis using cd, then run a command-line text editor called Nano to create a file called draft.txt:
cd thesis
nano draft.txt
Let’s type in a few lines of text. 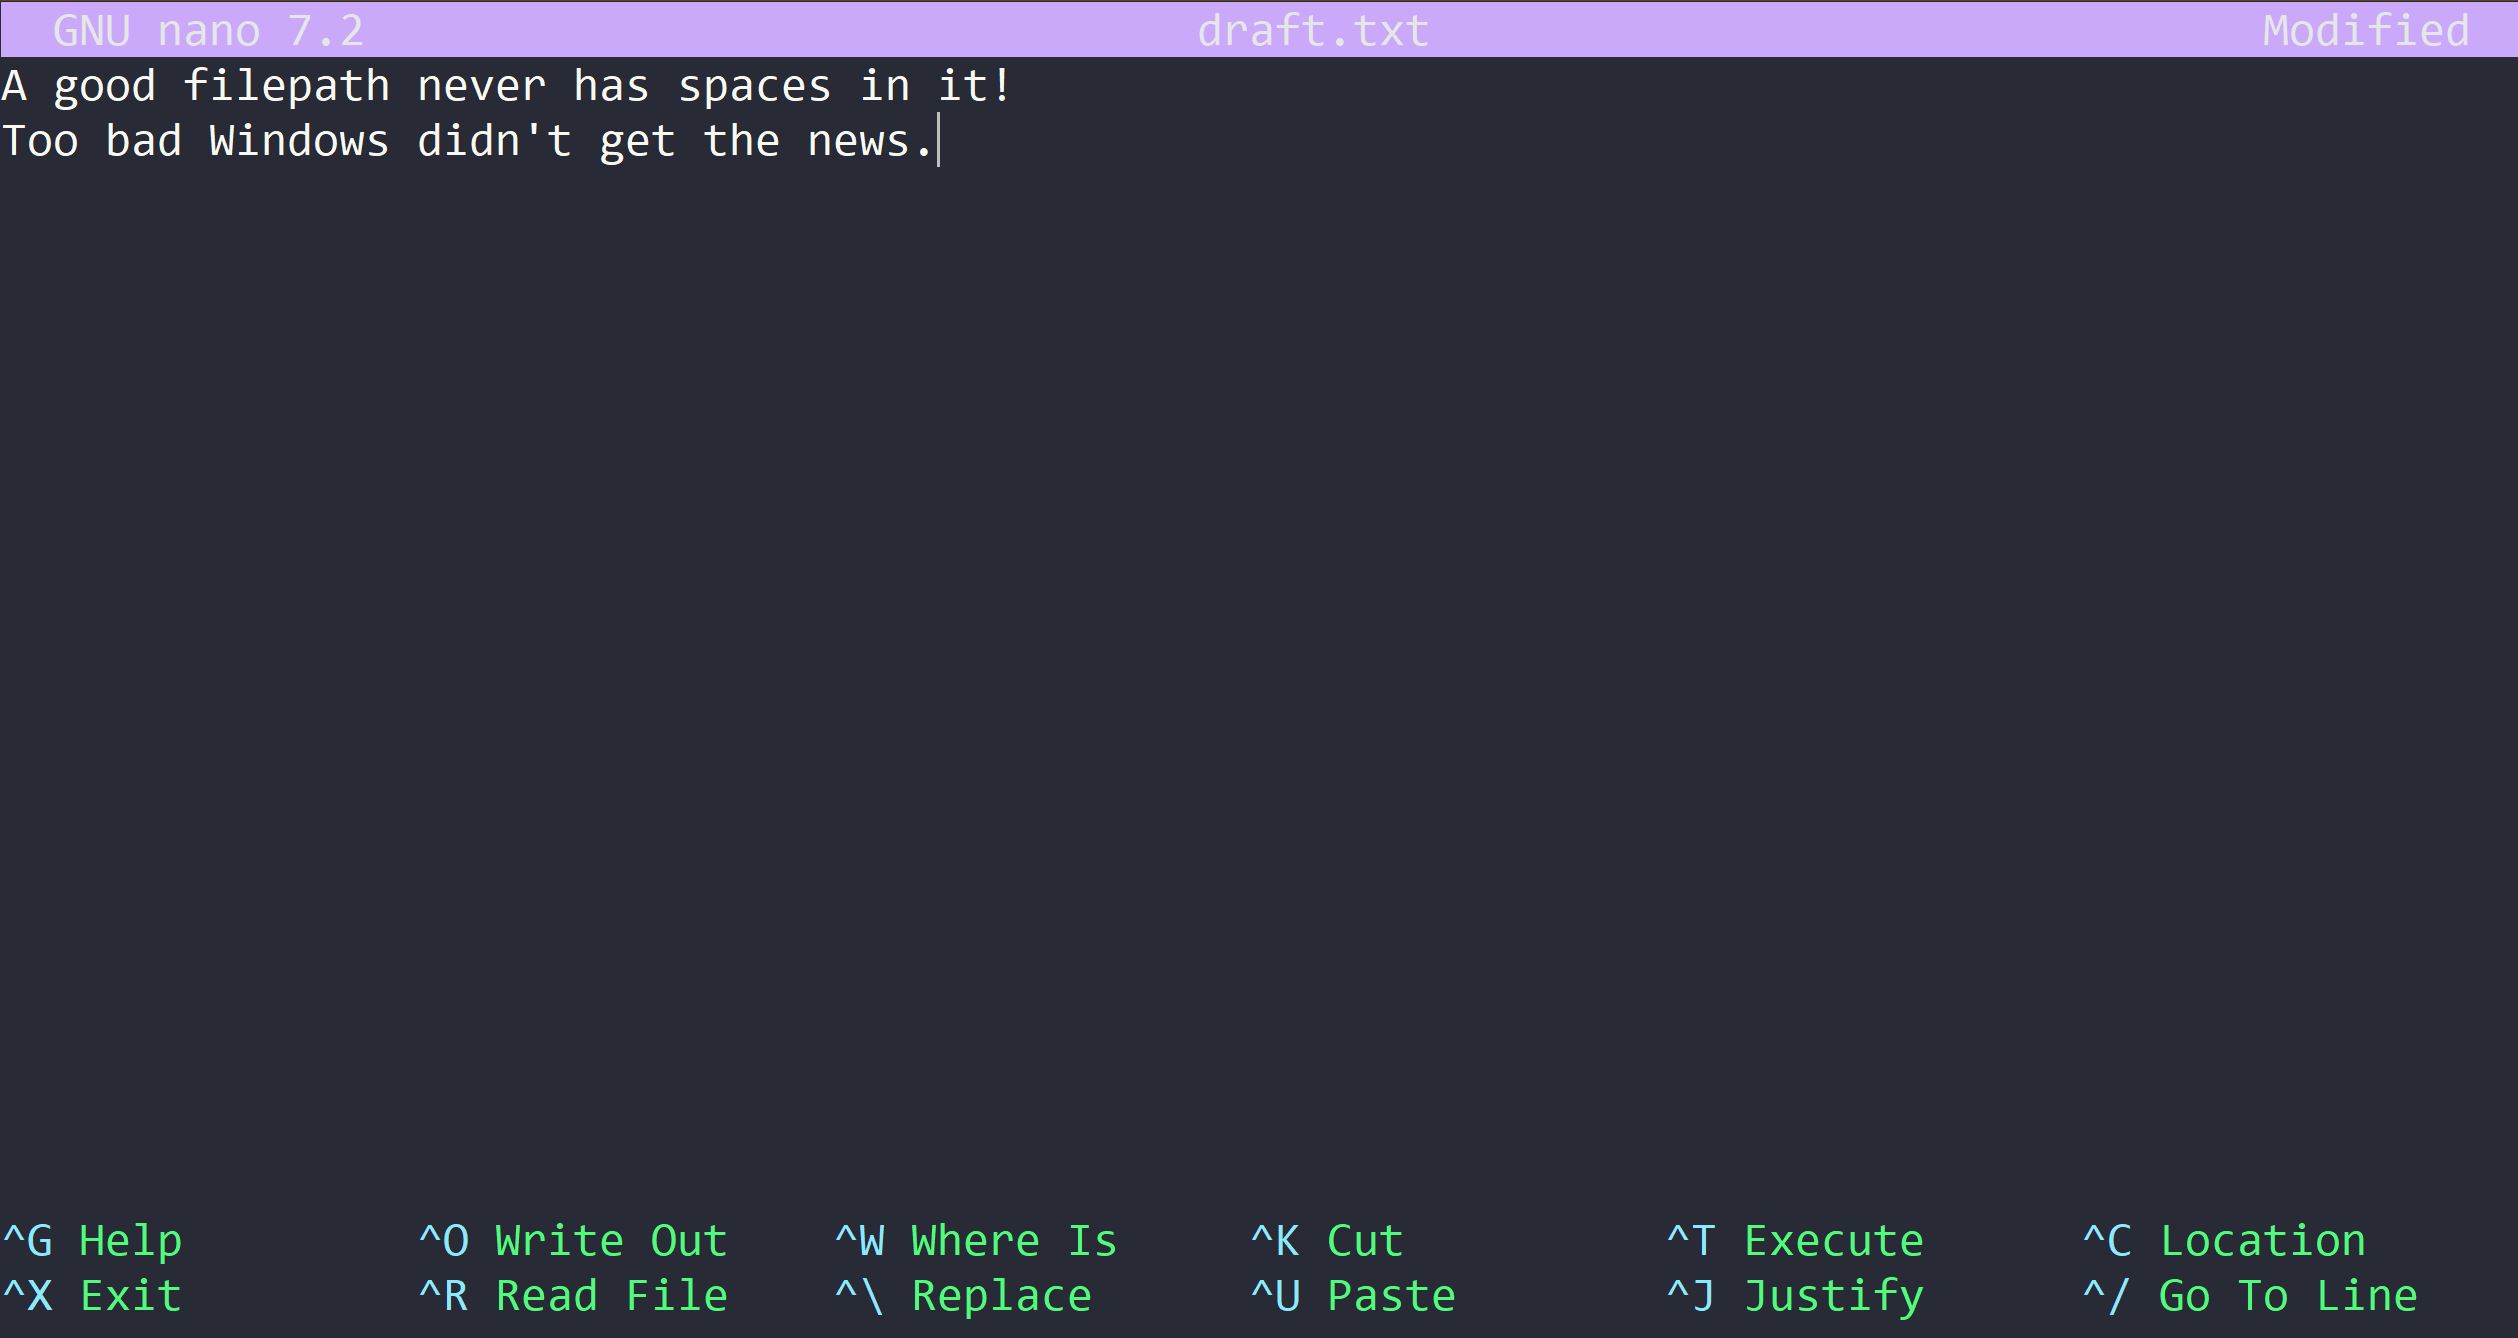
Once we’re happy with our text, we can press Ctrl+O (press the Ctrl or Control key and, while holding it down, press the O key) to write our data to disk. Press Return to write out to draft.txt.
Once our file is saved, we can use Ctrl+X to quit the editor and return to the shell.
nano doesn’t leave any output on the screen after it exits, but ls now shows that we have created a file called draft.txt:
$ ls
draft.txt
Renaming and Moving with mv
Return to the talapas-bash/exercise-data/writing directory, using ... This means we need to navigate to the parent of thesis.
cd ..
In our thesis directory we have a file draft.txt. Let’s change the file’s name using mv, which is short for ‘move’:
mv thesis/draft.txt thesis/wisdom.txt
The first argument tells mv the source file or folder, while the second is the destination. In this case, we’re moving thesis/draft.txt to thesis/wisdom.txt, which has the same effect as renaming the file. Now, ls shows us that thesis now contains one file called wisdom.txt:
ls thesis
wisdom.txt
One must be careful when specifying the target file name, since mv will silently overwrite any existing file with the same name. For example, if we move LittleWoman.txt to haiku.txt, we will be left with one file named haiku.txt that has the contents of the novel Little Women.
mv LittleWomen.txt haiku.txt
ls -f
haiku.txt thesis/
Looking at Long Files with less
Speaking of that long text files, let’s practice looking at long files (like logs, extensive code) from the command line with a screen reader called less.
less haiku.txt
Use the arrow keys to scroll through the text and the Q-key to exit the manual.
By default, mv will not ask for confirmation before overwriting files. However, an additional option, mv -i (or mv --interactive), will cause mv to request such confirmation.
Note that mv also works on directories.
Let’s move wisdom.txt into the current working directory writing.
We use mv once again, but this time we’ll use just the name of a directory as the second argument to tell mv that we want to keep the filename but put the file somewhere new.
In this case, the directory name we use is the special directory name . that we mentioned earlier.
mv thesis/wisdom.txt .
This moves wisdom.txt from thesis to the current working directory. ls now shows us that thesis is empty:
ls thesis
Alternatively, we can confirm the file wisdom.txt is no longer present in the thesis directory by trying to list it with ls.
This is a helpful debugging strategy for path resolution errors both locally and on Talapas.
ls thesis/wisdom.txt
ls: cannot access 'thesis/wisdom.txt': No such file or directory
We can also use this to see that wisdom.txt is now present in our current directory:
ls wisdom.txt
wisdom.txt
Copying files and directories: cp
The cp command is similar to mv, except it copies files and folders instead of moving or renaming them.
cp wisdom.txt thesis/quotations.txt
ls wisdom.txt thesis/quotations.txt
wisdom.txt thesis/quotations.txt
We can also copy a directory and its contents by using the recursive option -r:
cp -r thesis thesis_backup
We can check the result by listing the contents of both the thesis and thesis_backup directory. The contents are identical.
ls thesis thesis_backup
thesis:
quotations.txt

thesis_backup:
quotations.txt
It is important to include the -r flag to recursively copy the folders’ contents – all subfolders and files – when moving nonempty folders. If you want to copy a directory and omit this option, you will see a message that the directory has been omitted with -r not specified.
cp thesis thesis_backup
cp: -r not specified; omitting directory 'thesis'
The recursive -r flag is an extremely common option. Keep in eye out for it in other Bash commands that manipulate or traverse folders.
Creating Empty Files: touch
To create an empty file, use the touch command followed by one or more file paths.
Let’s make an empty directory and put a few placeholder (empty) files inside.
mkdir journal
touch journal/day1.txt journal/day2.txt
To show that these files are empty (size 0B), we can use the ls -l commands, which shows the directory contents in a long-listing format.
ls -lh journal
-rw-r--r-- 1 Erin 197121 0 Feb  3 00:17 day1.txt
-rw-r--r-- 1 Erin 197121 0 Feb  3 00:17 day2.txt
In this case, file size 0 is the 5th column.
Removing Files and Directories with rm
Returning to the talapas-bash/exercise-data/writing directory, let’s tidy up this directory by removing the original wisdom.txt file we created.
The command we’ll use for this is rm or remove:
rm wisdom.txt
Check the file is gone with ls:
ls wisdom.txt
ls: cannot access 'wisdom.txt': No such file or directory
If we try to remove the thesis directory using rm thesis, we get an error message:
rm thesis
rm: cannot remove 'thesis': Is a directory
This happens because rm by default only works on files, not directories.
rm can remove a directory and all its contents if we use the recursive option -r, and it will do so without any confirmation prompts:
rm -r thesis
Given that there is no way to retrieve files deleted using the shell, rm -r should be used with great caution. Consider adding the interactive option rm -r -i, which will prompt for the individual deletion of each file in the recursive traversal.
Deleting from the Command Line is Forever
The Unix shell doesn’t have a recycle bin that we can recover deleted files from.
On Talapas, your only hope in scenarios like this is to restore a version of the file or folder from a system backup. As researchers working in a shared computing environment, it is your responsibility not to use rm on project files and folders unless it is safe to remove them.
Wildcards: *, ?
* is a wildcard, which represents zero or more other characters. Let’s consider the talapas-bash/exercise-data/alkanes directory.
cd ~/talapas-bash/exercise-data/alkanes
ls -F
cubane.pdb ethane.pdb explosive/ methane.pdb octane.pdb pentane.pdb propane.pdb
*.pdb represents ethane.pdb, propane.pdb, and every file that ends with ‘.pdb’. Let’s test this by using with ls.
ls *.pdb
cubane.pdb ethane.pdb methane.pdb octane.pdb pentane.pdb propane.pdb
On the other hand, p*.pdb only represents pentane.pdb and propane.pdb, because the ‘p’ at the front can only represent filenames that begin with the letter ‘p’.
ls p*.pdb
pentane.pdb propane.pdb
? is also a wildcard, but it represents exactly one character. So ?ethane.pdb can only represent methane.pdb whereas *ethane.pdb represents both ethane.pdb and methane.pdb.
ls ?ethane.pdb
methane.pdb
Wildcards can be used in combination with each other. For example, ???ane.pdb indicates three characters followed by ane.pdb, giving cubane.pdb ethane.pdb octane.pdb.
When the shell sees a wildcard, it expands the wildcard to create a list of matching filenames before running the preceding command.
As an exception, if a wildcard expression does not match any file, Bash will pass the expression as an argument to the command as it is. For example, typing ls *.pdf in the alkanes directory (which contains only files with names ending with .pdb) results in an error message that there is no file with a .pdf extension.
ls *.pdf
ls: cannot access '*.pdf': No such file or directory
Commands like wc and ls see the lists of file names matching these expressions generated by the shell, but not the wildcards themselves. It is the shell itself that expands the wildcards.
Processing Files with wc and cat
Let’s look more closely at the alkanes folder that contains six files describing some simple organic molecules.
The .pdb extension indicates that these files are in Protein Data Bank format, a simple text format that specifies the type and position of each atom in the molecule.
$ ls
cubane.pdb    methane.pdb    pentane.pdb
ethane.pdb    octane.pdb     propane.pdb
Concatenating with cat
Let’s (con)catenate this file to the terminal to inspect its connects using cat.
cat methane.pdb
COMPND      METHANE
AUTHOR      DAVE WOODCOCK  95 12 18
ATOM      1  C           1       0.257  -0.363   0.000  1.00  0.00
ATOM      2  H           1       0.257   0.727   0.000  1.00  0.00
ATOM      3  H           1       0.771  -0.727   0.890  1.00  0.00
ATOM      4  H           1       0.771  -0.727  -0.890  1.00  0.00
ATOM      5  H           1      -0.771  -0.727   0.000  1.00  0.00
TER       6              1
END
Unlike nano, cat prints the contents of a file directly to the terminal and does not give us the opportunity to edit it. Commands like cat are not appropriate for longer files.
To look at a numeric summary of a text file, we can use the versatile wc or word count command.
wc cubane.pdb
20 156 1158 cubane.pdb
wc or “word count” counts the number of lines, words, and characters in files and displays them in that order from left to right.
If we run the command wc *.pdb, the * in *.pdb matches zero or more characters, so the shell turns *.pdb into a list of all .pdb files in the current directory.
wc *.pdb
  20  156  1158  cubane.pdb
  12  84   622   ethane.pdb
   9  57   422   methane.pdb
  30  246  1828  octane.pdb
  21  165  1226  pentane.pdb
  15  111  825   propane.pdb
 107  819  6081  total
Note that wc *.pdb also shows the total number of all lines in the last line of the output.
If we run wc -l instead of just wc, the output shows only the number of lines per file:
wc -l *.pdb
  20  cubane.pdb
  12  ethane.pdb
   9  methane.pdb
  30  octane.pdb
  21  pentane.pdb
  15  propane.pdb
 107  total
The -m and -w options can also be used with the wc command to show only the number of characters or the number of words, respectively.
Writing Output to Files: > and >>
Which of these protein database files contains the fewest lines? It’s an easy question to answer when there are only six files, but what if there were 6000? Our first step toward a solution is to run the command:
wc -l *.pdb > lengths.txt
The greater than symbol, >, tells the shell to redirect the command’s output to a file instead of printing it to the screen.
This command prints no screen output, because everything that wc would have printed has gone into the file lengths.txt instead. If the file doesn’t exist prior to issuing the command, the shell will create the file. If the file exists already, it will be silently overwritten. Thus, redirect commands require caution.
ls lengths.txt confirms that the file exists:
ls lengths.txt
lengths.txt
We can now send the content of lengths.txt to the screen using cat lengths.txt.
cat lengths.txt
  20  cubane.pdb
  12  ethane.pdb
   9  methane.pdb
  30  octane.pdb
  21  pentane.pdb
  15  propane.pdb
 107  total
We’ll continue to use cat in this lesson, for convenience and consistency, but it has the disadvantage that it always dumps the whole file onto your screen.
Filtering Output with sort, head, and tail
Next we’ll use the sort command to sort the contents of the lengths.txt file.
The file talapas-bash/exercise-data/numbers.txt contains the following lines:
10
2
19
22
6
If we run sort on this file, the output is:
10
19
2
22
6
If we run sort -n on the same file, we get this instead:
2
6
10
19
22
This is because the -n option specifies a numerical rather than an alphanumerical sort.
The sort command alone does not change input files; it prints their lines in sorted order to the screen.
sort -n lengths.txt
  9  methane.pdb
 12  ethane.pdb
 15  propane.pdb
 20  cubane.pdb
 21  pentane.pdb
 30  octane.pdb
107  total
We can put the sorted list of lines in another temporary file called sorted-lengths.txt by putting > sorted-lengths.txt after the command, just as we used > lengths.txt to put the output of wc into lengths.txt.
Once we’ve done that, we can run another command called head to get the line of sorted-lengths.txt:
sort -n lengths.txt > sorted-lengths.txt
head -n 1 sorted-lengths.txt
9 methane.pdb
This tells us that methane.pdb is the shortest of the files, with only 9 lines.
Using -n 1 with head tells it that we only want the first line of the file; -n 20 would get the first 20, and so on.
Waiting for Input…
What happens if a command is supposed to process a file, but we don’t give it a filename? For example, what if we type wc -l but don’t type anything after the command?
wc -l
Since it wasn’t supplied filenames as arguments, wc waits for us to give it a path to data interactively.
If you make this kind of mistake, you can escape out of this state by holding down the control key (Ctrl) and pressing the letter C once: Ctrl+C. Then release both keys.
Ctrl+C can also be used to exit running programs, so this is an essential skill for interacting with the command line.
Warning: Redirecting to the same file
It’s a very bad idea to try redirecting the output of a command that operates on a file to the same file. For example:
sort -n lengths.txt > lengths.txt
Doing something like this may give you incorrect results and/or delete the contents of lengths.txt. Do not actually run this command.
Peeking at the Bottom with tail
The last head command, which prints the first few lines of a text file. By default it prints the first 10, but we can use the -n flag followed by a number to indicate how many lines we want to print.
head -n 1 sorted-lengths.txt
9 methane.pdb
tail is similar, but prints it lines from the end of a file instead.
If we look at the last two lines of sorted-lengths.txt using tail -n 2 sorted-lengths.txt, we get the longest and the total lengths of all the .pdb files instead.
tail -n 2 sorted-lengths.txt
  30 octane.pdb
 107 total
Accumulating Text: >> and echo
The most trivial of the commands that print to the terminal is echo which returns the strings or words you pass it as input back to you as output.
echo "Good afternoon"
Good afternoon
echo "Good afternoon" > greeting.txt
cat greeting.txt
Good afternoon
We can append to an existing file by using >>:
echo 'Backup your files' >> greeting.txt
cat greeting.txt
Good afternoon
Backup your files
echo 'Talapas doesn't count as backup' >> greeting.txt
cat greeting.txt
Good afternoon
Backup your files
Talapas doesn't count as backup
Quiz
Which would be appropriate for a maintaining a log file that is updated with one line per day representing the status of scientific pipeline: > or >>?
Answer
You want to concatenate with >> because > would overwrite the previous day’s output.
Pipelines: The Magic of |
In our example of finding the file with the fewest lines, we used intermediate files lengths.txt and sorted-lengths.txt to store output. This is a confusing way to work because even once you understand what wc, sort, and head do, those intermediate files make it hard to follow. A special character | can allow us to the connect Bash commands together.
sort -n lengths.txt | head -n 1
9 methane.pdb
The vertical bar, |, between the two commands is called a pipe. It tells the shell that we want to use the output of the command on the left as the input to the command on the right.
This removes the need for the sorted-lengths.txt file.
Nothing prevents us from chaining pipes consecutively. We can for example send the output of wc directly to sort, and then send the resulting output to head. This removes the need for any intermediate files.
We’ll start by using a pipe to send the output of wc to sort:
wc -l *.pdb | sort -n
   9 methane.pdb
  12 ethane.pdb
  15 propane.pdb
  20 cubane.pdb
  21 pentane.pdb
  30 octane.pdb
 107 total
We can then send that output through another pipe, to head, so that the full pipeline becomes:
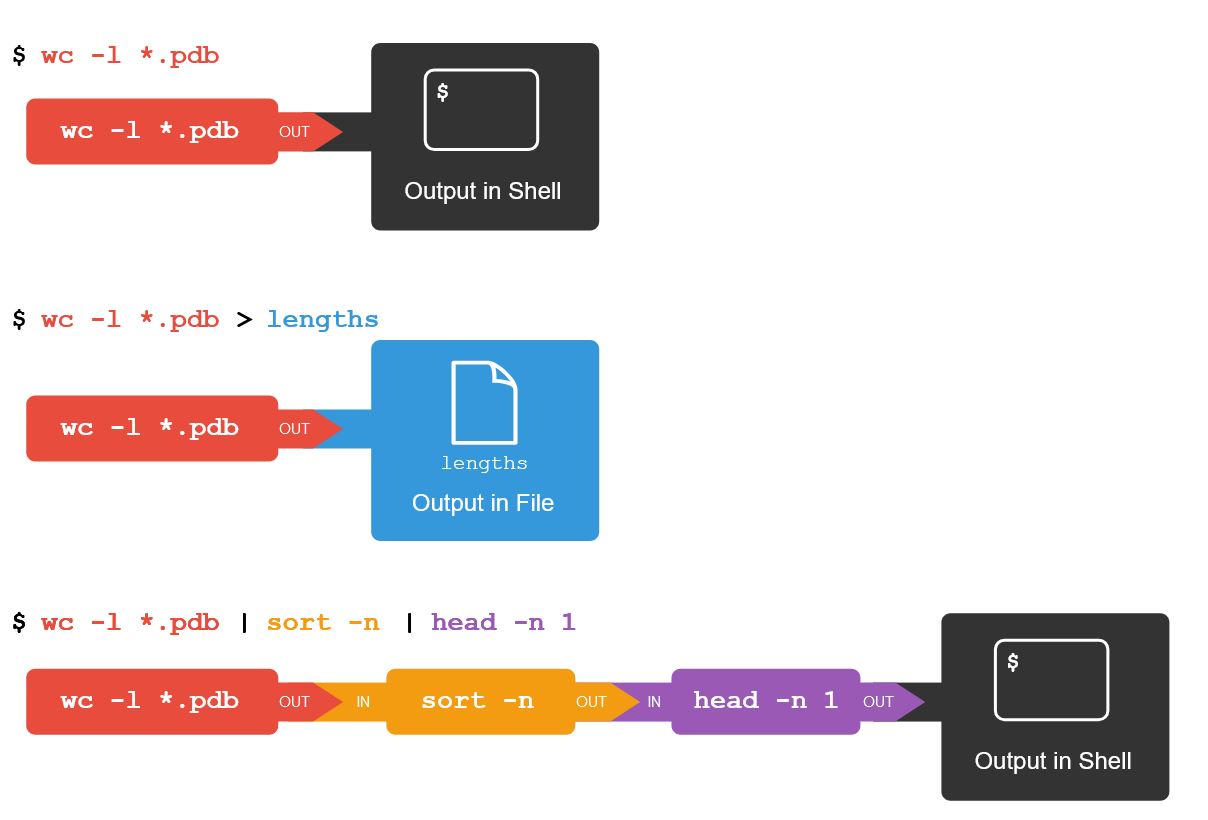
wc -l *.pdb | sort -n | head -n 1
9 methane.pdb
The redirection and pipes used in the last few commands are illustrated below:
Getting Help with Linux Commands: man and help
Commands like ls have so many options that even the most experienced users wouldn’t have them all memorized. As you encounter new commands, use the GNU manual and references like StackOverflow to guide you in configuring their options and options.
The manual pages for most commands can be accessed as follows:
Mac OS, Linux
man wc
Use the arrow keys to scroll through the text and the Q-key to exit the manual.
Windows
wc --help
The --help flag prints the contents of the manual directly to the terminal instead. Scroll upwards with your scroll bar to see the output.
Clearing the Screen: clear
As we wrap up for the day, let’s clear the text that has been printed to the terminal with the clear command. This will not affect your command history or any of your files.
Today’s Bash Command List
| command | description | example usage |
|---|---|---|
| pwd | print working directory | pwd |
| ls | list stuff (files, folders) | ls -lha |
| cd [directory] | change directory | cd ~/Pictures |
| mkdir [directory_name(s)] | make directory | mkdir my_new_dir |
| rm [file(s)] | remove files (permanently) | rm a.txt b.txt |
| nano [filename] | create or open file at filename | nano draft.txt |
| less [filename] | open a paged reader for filename | less bigDoc.md |
| touch [filename] | create an empty file at filename | touch empty.txt |
| mv [old] [new] | move (or rename) files and folders | mv water.txt wine.txt |
| cp [old] [new] | copy files or folders to a new location | cp old.txt backup/ |
| wc [filename] | prints line, word, and char counts | wc list.txt |
| cat [filename] | prints the contents of a file to the screen | cat list.txt |
| command > [filename] | redirects the output of a command to file | ls > files.txt |
| sort [filename] | sorts the lines of a file | sort -n rows.csv |
| head -n [# lines] [file] | print the first # lines of a file or files | head -n long-novel.txt |
| clear | clears the terminal screen (not the history) | clear |
Learn More About Bash
- The Linux command line for beginners, Ubuntu Tutorials.
- A short Bash tutorial designed for Ubuntu users with a summary of the historical context for UNIX and Linux. You can install Ubuntu for free and follow along in the GUI with VirtualBox.