Day Two: Bash Scripting on Talapas
This lesson is adapted from The Unix Shell lesson of Software Carpentry.
- Where Are You? (Revisited)
- Shell Access: Login Nodes and Compute Nodes
- Who and Where Am I:
hostname,whoami,who - Unix Permissions
- Transferring Files to and from Talapas with
scp - Finding Lines in Files with
grep - Finding Files by Name with
find - Bash Scripts
- Variables in Bash
- Loops: Easy as
for,do,done - Stdout, Stderr
- The PATH Variable
- Our First Slurm Job
- Today’s Bash Command List
- Learn More
Where Are You? (Revisited)
Open your terminal application.
Enter the hostname command, which prints the name of the current computer or “host” for the shell.
hostname
The result will vary from person to person, as this should be the system name of your laptop.
UO-2012173
Let’s connect to one of the Talapas login nodes through ssh. For the purposes of this exercise, let’s connect to login2.talapas.uoregon.edu, one of the four login nodes.
ssh [yourDuckID]@login2.talapas.uoregon.edu
You will prompted for the password for your DuckID. When you enter your password, you should see a welcome screen that looks something like this, followed by a $ prompt symbol.
# Welcome to Talapas!
# Data on Talapas is NOT backed up. Data management is each users responsibility.
#
#
# Need support? Please visit the Talapas Knowledge Base:
#https://uoracs.github.io/talapas2-knowledge-base/
You should now be inside your home directory on Talapas. Just like on your local filesystem, the default working directory on login is your home directory.
pwd
/home/emwin
Note that just this working directory path is not enough to tell you where are you really are. As a device keyed to the same DuckID, my work laptop has an emwin home directory too, but it’s a completely separate filesystem.
Talapas’s network filesystem is physically located in the Millrace building by the river. Though it might be backed up to a cloud service provider like OneDrive, your laptop’s filesystem is stored on a disk drive inside your laptop.
We’re going to talk about the process of transferring files to and from the cluster in detail soon, but the aspect of filesystem separation is worth considering from the outset.
Shell Access: Login Nodes and Compute Nodes
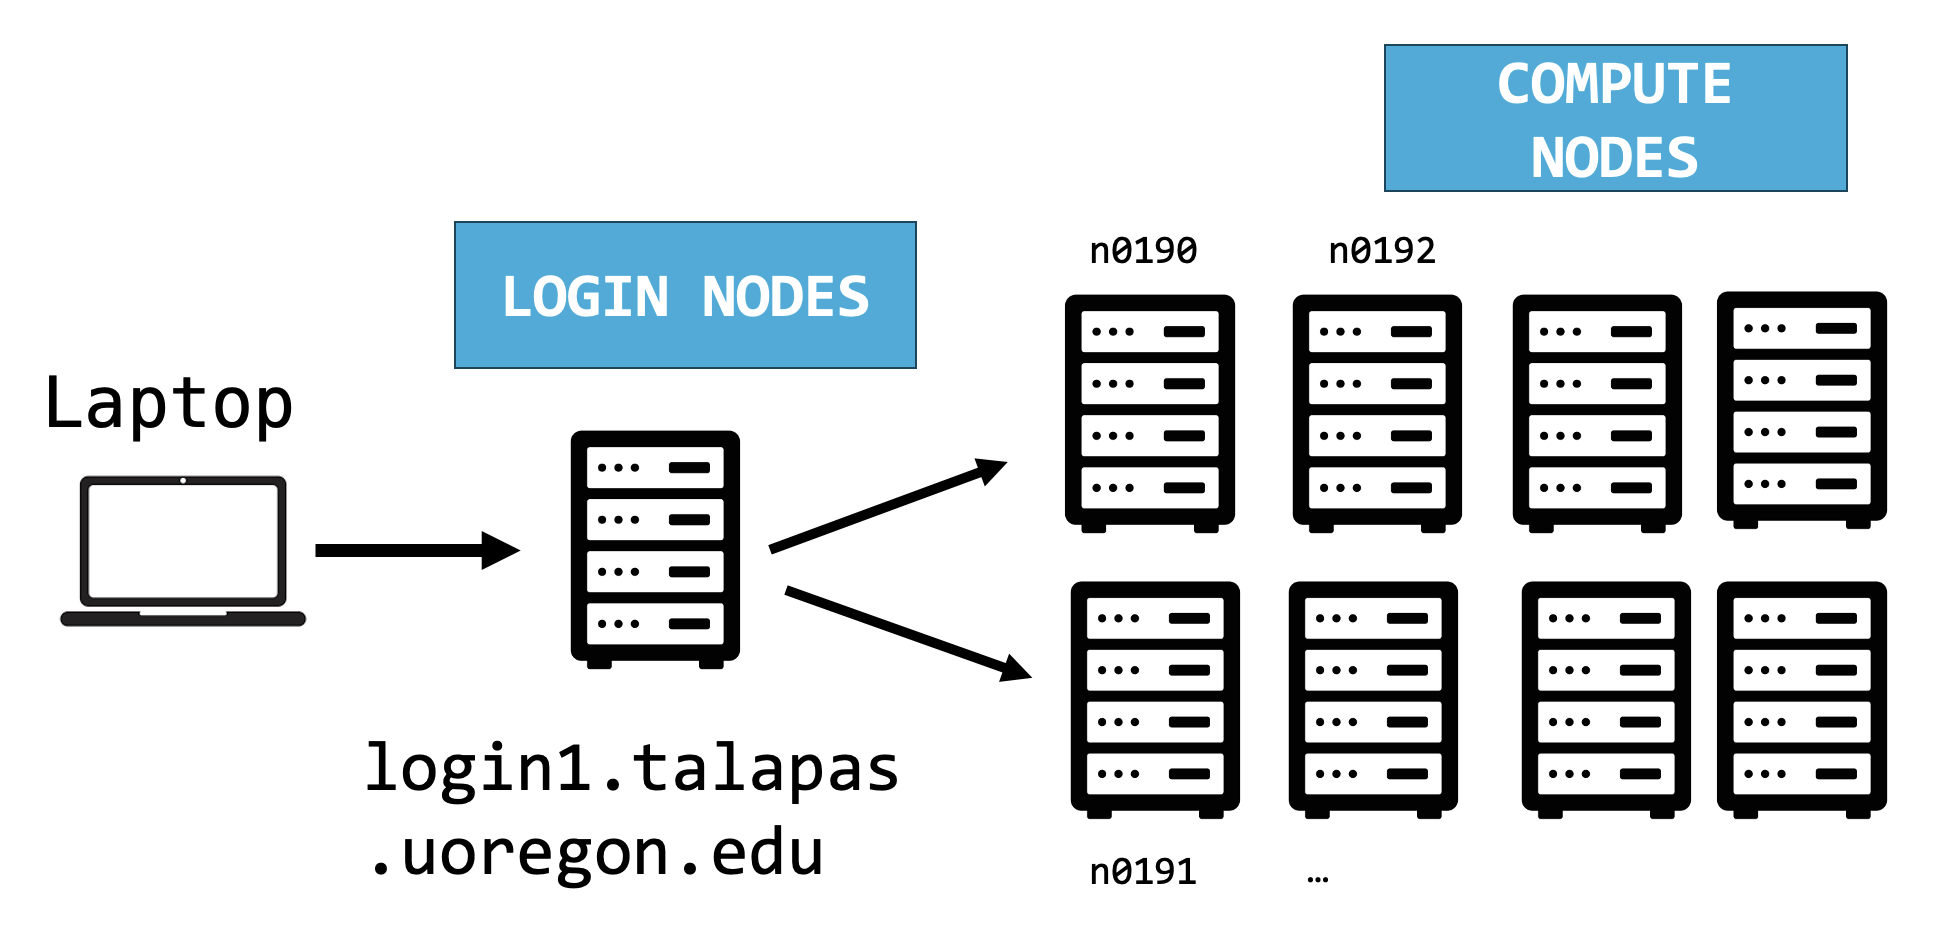 A simplified diagram of the structure of Talapas Whether you choose to access Talapas through the web terminal or through the command line, you will start at a login node.
The login node is a place to prepare input data, organizes, edit code, and configure environment object but it’s not the appropriate node for executing non-trivial code. The login node should be used to launch Slurm jobs on compute nodes.
How much work is too much work? Any script that takes longer than a few seconds should be run on a compute node instead. There are only four login nodes relative to the hundreds of compute nodes.
Before running computationally intensive code check if are you running locally, on a login node, or on an interactive node.
Who and Where Am I: hostname, whoami, who
To find out the name of the computer (or node) you are connected to, use the hostname command.
hostname
login2.talapas.uoregon.edu
As expected, we are on one of the login nodes. There are four login or “head” nodes for Talapas numbered login1, login2, login3, and login4 respectively.
You can ssh to login.talapas.uoregon.edu to let special load balancer decide which login node connect to instead of selecting a particular node.
Let’s try another command. Who are you? whoami
whoami
This should give you your DuckID.
emwin
Talapas access is given through your DuckID. This is why, unlike other workshops we hold on campus, you must be an active member of the UO community to participate.
Let’s do a more interesting command: who. This command will let you see the DuckIDs of everyone connected to the current login node.
Run it and you should see a list of the DuckIDs of your classmates in the room and the DuckIDs of other researchers connected to the login node right now.
who
emwin
...
If you see a name twice, someone has multiple open terminals connected to Talapas right now. This is a common use case for users who might need to manage code in one filesystem location and inspect outputs in another.
Unix Permissions
Now that we’re on Talapas, let’s do an ls command with the long-listing argument and a human readable flag.
I want to take this opportunity to talk about UNIX permissions now that we’re all on machines with the same operating system. Because software cannot manipulate open, write or execute files without permission to do so for each file, permissions are a common source of code failures on shared filesystems.
Though many of you come from different labs, we all share a racs_training PIRG. That means, everyone should have access to the shared racs_training folder located in /projects/racs_training. Let’s examine the permissions of a certain file in the racs_training folder.
ls -lh /projects/racs_training/intro-hpc-f25/bash-on-talapas/greeting.txt
-r-xr-xr--. 1 emwin is.racs.pirg.racs_training 29 Oct 15 11:33 /projects/racs_training/intro-hpc-f25/bash-on-talapas/greeting.txt
It’s time to unpack results from the -l or long listing flag. Let’s see if we can understand what each field of a given row represents, working left to right.
- Permissions: On the very left side, there is a string of the characters
d,r,w,x, and-. Thedindicates if something is a directory (there is a-in that spot if it is not a directory). The otherr,w,xbits indicate permission to Read, Write, and eXecute a file. There are three fields ofrwxpermissions following the spot ford. If a user is missing a permission to do something, it’s indicated by a-.- The first set of
rwxare the permissions that the owner of the file has. - The second set of
rwxs are permissions that members of the file’s group share (in this case, the group is namedracs_training). - The third set of
rwxs are permissions for everyone else not in the group.
- The first set of
- References: This counts the number of references (hard links) to the item (file, folder, symbolic link or “shortcut”).
- Owner: This is the username of the user who owns the file. Their permissions are indicated in the first permissions field.
- Group: This is the PIRG (racs_training) associated with the file. Members of this user group have permissions indicated in the second permissions field.
- Size of item: This is the number of bytes in a file, in human-readable form thanks to the -h flag.
- Time last modified: This is the last time the file was modified.
- Filename: Filename.
Group membership is very important on Talapas, because it is configured such that research groups cannot see each other’s data. It’s also configured such that your home directory’s data is private to you.
For example, you can open files I’ve created within the racs_training project directory because this file has read permissions enabled for members of the racs_training PIRG.
Some labs have more complicated permissions hiearchies implemented in their ACL groups, but those will be covered in the Talapas-specific lesson.
We should all be able to cat this file to the terminal.
To avoid typing the long absolute path again, remember to use the up arrow key to traverse through your previous commands, and the left arrow to change ls to cat.
cat /projects/racs_training/intro-hpc-f25/bash-on-talapas/greeting.txt
Good afternoon! You'll need to make a copy of this file to modify it.
We can’t run the ls or cat command on files and folders we don’t have permission to read. For example, I’ll get a permissions error if I try to list the contents of someone else’s home directory.
ls /home/ghayden/
ls: cannot open directory '/home/ghayden': Permission denied
Note that, even if there were files in Gabriele’s home directory that were readable by anyone, I could not read them because I cannot traverse into her home directory.
To share a file or directory that you own with someone in your PIRG, you can grant read and execute privileges for them within the shared /project/[pirg_name] directory. However, you must also set the same privileges on any parent directories above the item you’re sharing. The execute bit for directories controls whether or not the folder can be traversed. Without execute permissions, you cannot see the child folders and files of folders you can otherwise read.
The best place to share files are in folders that are shared by your research group, like a project /projects/[pirg_name]/ directory.
Quiz
On websites like StackOverflow, you may advised to use the command chmod 777 or chmod -R 777 to alter the permissions of shared input files. Test this theory on an empty file in your home directory.
cd ~
touch the-universal-file.txt
chmod 777
What does this do? Why is this such a bad idea on shared filesystems?
Answer
Use ls -lh to examine how the permissions on the file have changed.
ls -lh the-universal-file.txt
-rwxrwxrwx. 1 emwin uoregon 0 Oct 15 13:19 the-universal-file.txt
This is a bad idea because it grants read, write, and execute permissions to all users for the file. In the majority of cases, your problems can be solved by giving group read access using to files and execute access on folders for your colleagues traversal, namely your PIRG’s /projects/pirg_name folder.
Transferring Files to and from Talapas with scp
Speaking of separate filesystems, today’s zip file isn’t on Talapas. Let’s move it there with the scp command.
The scp command needs to be run from our local machine, so let’s exit the login node briefly by typing exit.
exit
You should see a message like this after exiting.
logout
Connection to login2.talapas.uoregon.edu closed.
Confirm your terminal is connected to your laptop with the hostname command.
hostname
UO-2012173
Use pwd to check that you are in your home directory and ls talapas-bash.zip to make sure you have today’s zip folder ready.
pwd
ls talapas-bash.zip
talapas-bash.zip
Remember the cp command? With SSH access, you can use the scp or “secure copy” command to copy files/folders to and from Talapas.
Just like the cp command, the arguments for scp are indicated in [source] [destination] order.
To indicate a remote filesystem location, use the [yourDuckID]@login[node].talapas.uoregon.edu: prefix. Every character after the : refers to the filesystem as appears on a Talapas login node.
scp talapas-bash.zip [yourDuckID]@login2.talapas.uoregon.edu:~
talapas-bash.zip 100% 7187KB 5.4MB/s 00:01
Quiz
How would I copy the /projects/racs_training/intro-hpc-f25/bash-on-talapas/greeting.txt file to my home directory on my laptop using scp? (Use auto-complete on this lengthy path.)
Hint: Remember what the . character means?
Answer
scp [yourDuckID]@login2.talapas.uoregon.edu:/projects/racs_training/intro-hpc-f25/bash-on-talapas/greeting.txt .
greeting.txt 00% 52 0.8KB/s 00:00
Check the file transfer worked by using cat to concatenate its contents to the terminal.
cat greeting.txt
Good afternoon! You'll need to make a copy of this file to modify it.
Let’s get back to learning Bash. Use the arrow keys to traverse your command history and run the ssh command again.
ssh [yourDuckID]@login2.talapas.uoregon.edu
Confirm your zip file safely arrived at its destination in your Talapas home directory with an ls.
ls talapas-bash.zip
talapas-bash.zip
Now, let’s unzip it from the command line using the unzip command. (This may take a minute.)
unzip talapas-bash.zip
Use ls -F to confirm that you have an unzipped talapas-bash folder in your home directory.
...
talapas-bash.zip
talapas-bash/
...
When the file is unzipped, change your current working directory to talapas-bash. The contents of the folder should be familiar to you at this point.
cd talapas-bash
ls -F
books/ exercise-data/ scripts/
Let’s use auto-complete with tab to navigate to the exercise-data directory.
cd exercise-data
ls -F
alkanes/ animal-counts/ creatures/ mice/ numbers.txt writing/
Putting it Together: Pipes and Filters
This idea of linking commands through pipelines is part of the Unix ‘pipes and filters’ model. We’ve already seen pipes; a filter is a program like wc or sort that transforms a stream of input into a stream of output.
The key is that any program that reads lines of text from standard input and writes lines of text to standard output can be combined with every other program that behaves this way as well.
Let’s put some of these skills into practice.
Move into the mice directory and take a look at the files there.
cd mice
ls
Animals.txt README.md Tasks.txt Visit.txt citation.txt
We can pipe the results of the ls command to wc -l to count how many objects in the current working directory.
ls | wc -l
5
Quiz
How could I modify this command to get the number of .txt files in the current directory?
Answer
ls *.txt | wc -l
4
This folder contains data from a behavioral experiment on mice described in citation.txt.
The files Animals.txt, Tasks.txt and Visit.txt contain tab-separated observations with the first line of each observation indicating the variables in each row. Let’s see what each file tracks by using head -n 1 on each of the three files.
head -n 1 Animals.txt Tasks.txt Visit.txt
==> Animals.txt <==
Animal  Tag     Sex     Group   CornerAssigned

==> Tasks.txt <==
Date    Night   Task

==> Visit.txt <==
VisitID VisitOrder      Animal  Tag     Sex     Group
Module  Cage    Corner     CornerCondition PlaceError
SideErrors      TimeErrors      ConditionErrors    NosepokeNumber
NosepokeDuration        LickNumber      LickDuration
LickContactTime StartDate       StartTime       StartTimecode
EndDate EndTime EndTimecode     VisitDuration   Session
Finding Lines in Files with grep
Searching for something in one or more files is something we’ll often need to do, so let’s introduce a command for doing that: grep (short for global regular expression print). As the name suggests, it supports regular expressions and is therefore only limited by your imagination, the shape of your data, and - when working with thousands or millions of files - the processing power at your disposal.
Now let’s try our first search to find the row corresponding to mouse GK-1893 in Animals.txt.
grep GK-1893 Animals.txt
GK-1893 981098102199262 Female IC b 4
Visit.txt has 172197 rows documenting each behavioral event for each mouse in the study. Let’s use grep, wc, and | to find how many times (in how many rows) mouse GK-1983 was documented in Visit.txt.
grep GK-1893 Visit.txt | wc - l
11675
Grep always takes a pattern first, followed by the file or files to be searched for that pattern.
Remember that the shell will expand *.txt to a list of all the .txt files in the directory. grep will then search these for instances of the string “1990” and print the matching lines.
If you’re debugging a large programming project, the ability to quickly search for specific function or statements through the command line is crucial. Bash’s text search functionality is very fast.
By default grep prints the entire line, not just the portion that happens to match. It is also case-sensitive UNLESS we pass the -i flag.
Compare the results of these two queries.
grep -i Male Animals.txt
grep Male Animals.txt`
What’s happening here?
There are no Male animals in the study, but the -i searches with case-insensitivity.
Grep can be very useful, and I would recommend reading over its man page to play around with some of the options.
man grep (MacOS)
grep --help (Git Bash/Windows)
Grep is a great way to quickly make sense of a large file or large set of data. You can even use it to search the outputs of other commands.
Managing Command History: history
We’ve done a lot of typing so far. Conveniently, the shell tracks the commands you’ve typed. Don’t count on this history to be there after a reboot though.
To see your command history, type history.
history
Quiz
How can we use | and grep and wc to count how many times you’ve typed the command pwd on Talapas today?
Answer
history | grep 'pwd' | wc -l
Finding Files by Name with find
While grep finds lines in files, the find command finds files themselves. Like grep, find has many sophisticated options worth exploring independently.
Let’s move up the filesystem tree to the talapas-bash directory.
cd ..
To get a picture of the full tree rooted at talapas-bash use ls -R.
ls -R
.:
books  exercise-data  scripts

./books:
bleak-house.txt  call-of-the-wild.txt  pride-and-prejudice.txt

./exercise-data:
alkanes        creatures        mice         sorted-numbers.txt
animal-counts  first-script.sh  numbers.txt  writing

./exercise-data/alkanes:
cubane.pdb           lengths.txt  propane.pdb
ethane.pdb           methane.pdb  sorted-lengths.txt
explosive            octane.pdb
folder_contents.txt  pentane.pdb

./exercise-data/alkanes/explosive:
ethane.pdb  methane.pdb

./exercise-data/animal-counts:
animals.csv

./exercise-data/creatures:
basilisk.dat  minotaur.dat  unicorn.dat

./exercise-data/mice:
Animals.txt  citation.txt  README.md  Tasks.txt  Visit.txt

./exercise-data/writing:
haiku.txt  LittleWomen.txt

./scripts:
a-slow-script.sh
Here’s how find behaves without specifying a filename pattern to match.
find .
.
./books
./books/pride-and-prejudice.txt
./books/call-of-the-wild.txt
./books/bleak-house.txt
...
This gives us everything in the current directory.
As always, the . on its own means the current working directory, which is where we want our search to start.
If we try the type option to filter our input, by using -type d to find directories we get more granular results.
find . -type d
.
./books
./exercise-data
./exercise-data/writing
./exercise-data/mice
./exercise-data/alkanes
./exercise-data/alkanes/explosive
./exercise-data/creatures
./exercise-data/animal-counts
./scripts
Notice that the objects find finds are not listed in any particular order. If we change -type d to -type f, we get a listing of all the files instead:
find . -type f
./books/pride-and-prejudice.txt
./books/call-of-the-wild.txt
./books/bleak-house.txt
./exercise-data/writing/haiku.txt
./exercise-data/writing/LittleWomen.txt
...
But what if we want to specify files with names (or patterns for names)? This is helpful when tracking down data with a detailed metadata structure. We can use the the -name option for this.
find . -name '*.md'
./exercise-data/mice/README.md
This returns only files that end in .md. Quoting is very important here, as Bash treats single-quotes and double-quotes differently.
Bash Scripts
We’ve been running increasingly complicated commands, and it’s time to think about putting them into a script to make them reusable.
When you give batch jobs to Slurm on Talapas, you will have typically give them in the form of shell scripts, signified by the .sh file extension.
Let’s use nano to write our first script.
nano hello.sh`
#!/bin/bash
# This is a comment, which will be ignored
echo "Hello World"
As always, use Ctrl+O then Enter to write out your text to hello.sh. Then use Ctrl+X to exit nano.
The #!/bin/bash comment is important, it communicates which executable (which shell) should run this script. Normally # indicates a commented line in Bash and causes the line to be ignored during execution.
Now, if we try to run it like any old command, we’ll get an error.
hello.sh
-bash: hello.sh: command not found
The source command tells the current shell to execute each line of a text file as a sequence of commands.
source hello.sh
Hello World
You could choose to execute it using ./hello.sh, which is much like running python3 myfile.py or Rscript myscript.R on Python and R scripts respectively. This works as long as we have execute permissions on the file.
ls -lh hello.sh
chmod u+x hello.sh
./hello.sh
Hello World
Congratulations, you’ve written your Bash first script!
For our next exercise, move to the talapas-bash parent directory.
cd ~/talapas-bash
Now, let’s write a script that uses the find command to find files that end in .txt in the exercise-data` directory.
nano find-text.sh
#!/bin/bash
find exercise-data -name '*.txt'
Let’s run it to see if it works.
chmod +x find-text.sh
./find-text.sh
exercise-data/numbers.txt
exercise-data/alkanes/lengths.txt
exercise-data/alkanes/sorted-lengths.txt
exercise-data/mice/citation.txt
exercise-data/mice/Tasks.txt
exercise-data/mice/Animals.txt
exercise-data/mice/Visit.txt
exercise-data/writing/journal/day1.txt
exercise-data/writing/journal/day2.txt
exercise-data/writing/haiku.txt
exercise-data/writing/thesis/quotations.txt
It works, so let’s move it to that scripts directory we already have.
mv find-text.sh scripts
ls -F
books/		scripts/
exercise-data/
Navigating to the scripts folder, we can see it’s there now.
cd scripts
ls
a-slow-script.sh
find-text.sh
Quiz
Now, something different is going to happen when I run the find-text.sh from inside the scripts directory. Why?
./find-text.sh
find: exercise-data: No such file or directory
Answer
The reason we get a “no such file or directory” error is that the filesystem as seen by a script is relative to the current working directory.
The current working directory is the scripts diretory, so the exercise-data folder is nowhere to be found.
Let’s use command-line arguments to make this script more flexible.
nano find-text.sh
We’re going to replace exercise-data with a special symbol that indicates an argument.
#!/bin/bash
find "$1" -name '*.txt'
Inside a Bash script, $1 means the first filename (or other argument) on the command line. The quotes around it are to capture files with spaces in their names.
We can now run our script like this on an arbitrary directory like mice instead:
./find-text.sh ../exercise-data/mice/
../exercise-data/mice/citation.txt
../exercise-data/mice/Tasks.txt
../exercise-data/mice/Animals.txt
../exercise-data/mice/Visit.txt
To reference additional arguments, use $2, $3 and so on.
Variables in Bash
The shell is a program, and like other programs, it has variables. Those variables control its execution, so by changing their values you can change how the shell and other programs behave.
Every variable has a name. By convention, Bash constants are given upper-case names.
Let’s show the value of the environment variable HOME, or the path of your home directory:
echo HOME
HOME
That just prints “HOME”, which isn’t what we wanted. Let’s try this instead:
echo $HOME
/home/emwin
This behavior is different from languages like R and Python. The dollar sign tells the shell that we want the value of the variable rather than its name.
echo $HOSTNAME
login2.talapas.uoregon.edu
To set our own variables for a terminal session, we can use the following syntax:
FAMILY_PET='Scout'
echo $FAMILY_PET
Scout
Unlike environment variables, which remain consistent between terminal sessions, the FAMILY_PET variable will disappear after this Bash session ends.
Loops: Easy as for, do, done
Loops are a programming construct which allow us to repeat a command or set of commands for each item in a list. As such they are key to productivity improvements through automation. Similar to wildcards and tab completion, using loops also reduces the amount of typing required (and hence reduces the number of typing mistakes).
Let’s copy a certain folder from the racs_training folder to your home directory. You will need to use the recursive flag -r to copy the contents of the folder. Use the tab auto-complete feature rather than try to memorize the path.
cp -r /projects/racs_training/intro-hpc-f25/bash-on-talapas .
cd bash-on-talapas
If you look inside your copy of the bash-on-talapas directory, you’ll see a script called loop.sh.
Use cat to print it to the terminal.
cat loop.sh
#!/bin/bash
for i in 1 2 3 4 5 6 7 8 9 10 11 12 13 14 15;
do
	echo $i # Print the current number
	sleep 1 # Wait one second before the next
done
Let’s unpack it line-by-line!
It’s a bash script, so it has #!/bin/bash line.
When the shell sees the keyword for, it knows to repeat a command (or group of commands) once for each item in a list. Each time the loop runs (called an iteration), an item in the list is assigned in sequence to the variable, and the commands inside the loop are executed, before moving on to the next item in the list. Inside the loop, we call for the variable’s value by putting $ in front of it.
The $ tells the shell interpreter to treat the variable as a variable name and substitute its value in its place, rather than treat it as text or an external command.
It uses our first for-loop, which is indicated by for. The loop runs once for each possible value of the loop variable i. i will take on each value of the numbers that follow in once and in order. That is, it will take on the value of 1-15 inclusive, and then the loop will terminate at done.
For-loops are a popular control flow structure in Python, too.
This code is equivalent to this loop in Python.
# Python
import time # Sleep is separate module in Python
for i in range(1, 16): #16 is not included
    print(i) # Print i
    sleep(1) # Wait for one second
And it’s equivalent to this loop in R.
# R
for (i in 1:15){ # 1-15 inclusive
  print(i) # Print i
  Sys.sleep(1) # Wait for one second
}
Check that you have permission to run the script.
ls -lh
-r--r--r--. 1 emwin uoregon 159 May 14 08:38 a-slow-script.sh
In this case, I do not have permission to execute this file. I need to add execute permissions.
chmod u+x loop.sh
ls -lh
-r-xr-xr-x. 1 emwin uoregon 159 May 14 08:38 loop.sh
Now, I can run the script.
./loop.sh
1
2
3
This script will run for at least fifteen seconds before terminating on its own, which could be bothersome.
This brings me to Ctrl+C. Use it to commands or programs that are running too slowly, caught in loops, or printing too much text to standard out.
Cancel the script using Ctrl+C before it prints all fifteen numbers.
Loops are a crucial control flow construct among all programming languages. Looking ahead, one way of parallelizing code written in serial form is to identify independent, non-sequential operations represented by a loop and to convert them into separate or threads processes that can be distributed among parallel jobs or threads.
Stdout, Stderr
Thus far, you have learned to run Bash commands in which output is either directed to stdout, the terminal, or redirected to a file.
We will now differentiate between standard out (stdout) and (stderr).
For any given command or program, output can be written to stdout or stderr. Stderr, by default, is a separate stream from stdout, even though it prints to the terminal by default too.
Let’s navigate back to the talapas-bash directory and do a quick ls.
cd
ls
books		scripts
exercise-data
This command runs without creating errors; it prints a list of folders to stdout. But what if try to inspect the contents of a folder that doesn’t exist?
ls FAKEDIR
ls: FAKEDIR: No such file or directory
If we try to redirect the output of this command, something strange happens: the error message still prints to the terminal and log.txt remains empty.
ls FAKEDIR > log.txt
ls: FAKEDIR: No such file or directory
To redirect stderr to file, we must prefix > with 2> to indicate that we want to redirect stderr.
ls FAKEDIR 2> error.txt
cat error.txt
ls: FAKEDIR: No such file or directory
A command that does not print to stderr will returns it output through stdout as usual.
echo "This won't error out" 2> error.txt
This won't error out
Because nothing was written out to stderr, error.txt is an empty file.
cat error.txt
The difference between stdout and stderror is important because Slurm jobs write output and error logs to separate files.
The PATH Variable
Do you know why the shell executes scripts given the form ./loop.sh or bash loop.sh but fails to recognize loop.sh?
Let’s start by inspecting the error message.
loop.sh
-bash: loop.sh: command not found
In the grammar of Bash, the first word is assumed to be an executable: either or a program built into the shell (ls, cd) or a program on the user’s PATH variable.
You can peek at your PATH on Talapas using echo $PATH, just like you would any other environment variable.
echo $PATH
/home/emwin/.local/bin:/home/emwin/bin:/gpfs/t2/slurm/apps/current/bin:/gpfs/t2/slurm/apps/current/sbin:/usr/local/bin:/usr/bin:/usr/local/sbin:/usr/sbin:/opt/dell/srvadmin/sbin
When you type a command like loop.sh, the shell searches the directories listed in the PATH variable for binaries of that name, starting from the first directory and searching the directories in order. Hiearchy matters!
Because the directory /home/emwin/intro-hpc-f25/bash-on-talapas is not on my PATH, the shell fails to find loop.sh in any of these folders.
If you would like to see where a binary on your PATH is located in the filesystem, you can use the which command. Let’s test which on the htop command!
The htop command is a process viewer. We can use it to see running processes and their resource usage. Given that we’re on a login node, the answer should be that we’re doing very little.
I’m going to pass in my DuckID to the -u or user argument so that I see only my processes.
htop -u emwin
Now, let’s inspect the file location of the htop command.
which htop
/usr/bin/htop
This tells us that’s it’s in the /usr/bin folder.
Quiz
Using echo and piping, how could I confirm that /usr/bin is on my PATH?
Answer
This could be done in several ways, but the simplest is to redirect the PATH variable to the input of grep.
echo $PATH | grep "/usr/bin"
Avoid Modifying your PATH on Talapas
You may have modified your PATH variable on your personal laptop without having realized it. Many command-line applications (like Python or Docker) modify your PATH during the installation process.
On Talapas, you should not modify your PATH manually, nor should you attempt to install any software. Directories (and the binaries stored there) are loaded onto your PATH through lmod.
Future lessons will discuss the nuances of lmod.
Our First Slurm Job
Before we go, I’d like to demonstrate the role Bash plays in distributing work among compute nodes in the cluster.
Navigate inside the slurm directory and inspect who.sh.
cd slurm
cat who.sh
#!/bin/bash

echo "Good afternoon!"
echo "This script is running as" $(whoami)
echo "This script is running on" $HOSTNAME
echo 'Done.'
Mark the script as executable and run it.
chmod u+x who.sh
./who.sh
Good afternoon!
This script is running as emwin
This script is running on login2.talapas.uoregon.edu
Done.
As we would expect, this script runs on the login node (where we shouldn’t do significant work) and writes its output to the terminal. When we run batch jobs on Talapas, we want work to be done on the compute nodes of the cluster and for their textual output, if any, to be written to a log file to be inspected later.
Now, let’s concatenate slurm-who.sbatch to the terminal and dissect it piece by piece. It looks very similar to who.sh, but it has special comments at the top that distinguish it as a script intended for the Slurm scheduler.
cat slurm-who.sbatch
#!/bin/bash
#SBATCH --account=racs_training
#SBATCH --partition=compute
#SBATCH --output=who-out.txt
#SBATCH --error=who-error.txt
#SBATCH --time=0-00:05:00
#SBATCH --cpus-per-task=1
#SBATCH --mem-per-cpu=500M

echo "Good afternoon!"
echo "This script is running as" $(whoami)
echo "This script is running on" $HOSTNAME
echo 'Done.'
At the top, it has the !/bin/bash sequence to indicate to Slurm that this is a Bash script. Slurm will not run files that are not Bash scripts.
What follows are sequences of special comments that tell Slurm how to run this script. These are parameters that are passed to Slurm that will decide when, where, and with how many resources, your job is run.
- account must be a valid PIRG. For this exercise, it’s racs_training. In the future, this will be your lab’s PIRG.
- job-name allows you to set the job name of your job for easy debugging and management. Modify this to FirstJob[YourDuckID]
- partition indicates which of Talapas’s partitions this job will run on. For most purposes, compute is appropriate.
- time total run time limit in (HH:MM:SS) before SLURM kills the job. Real-world jobs will take minutes to hours rather than seconds.
- cpus-per-task should be set to 1 for jobs that do not explicitly use multiprocessing libraries like OpenMPI.
- mem-per-cpu amount of memory per CPU core
- output the file location where the ouput from stdout should be logged
- error the file location where the output from stderror should be logged. will generate an empty file on job with no errors.
Let’s try running this file two ways: as a Bash script executed in the shell and as input to Slurm. First, give yourself execute permissions using chmod. Then, run the file using ./slurm-greeting.sbatch.
chmod +x slurm-who.sbatch
./slurm-who.sbatch
Good afternoon!
This script is running as emwin
This script is running on login2.talapas.uoregon.edu
Done.
But we don’t want it to run on the login node. Let’s pass it to SLURM using sbatch.
After you’ve carefully configured the job, queueing it is easy.
sbatch slurm-who.sbatch
Submitted batch job 39136076
Now that your job is queued, check its status using the squeue command.
Replace the following command with your DuckID.
squeue -u [MYDUCKID]
Or, use this shorthand.
squeue --me
If you see an empty queue, your job has already completed.
Check your job history using sacct. Scroll to the bottom to find the status of your most recent Talapas jobs.
sacct
JobID           JobName  Partition    Account  AllocCPUS      State ExitCode
------------ ---------- ---------- ---------- ---------- ---------- --------
39136076     slurm-who+    compute racs_trai+          1  COMPLETED      0:0
39136076.ba+      batch            racs_trai+          1  COMPLETED      0:0
39136076.ex+     extern            racs_trai+          1  COMPLETED      0:0
Now that the job has terminated, let’s look at the results.
cat who-out.txt
Good afternoon!
This script is running as emwin
This script is running on n0135
Done.
After being queued with sbatch, the job ran on n0135, a compute node.
Because the job didn’t err out, the who-err.txt file should be empty.
cat who-err.txt
This is a sneak peek of Slurm to demonstrate the role of Bash scripting on Talapas. We will dive deeper into this topic next week.
Today’s Bash Command List
| command | description | example usage |
|---|---|---|
| whoami | prints username | whoami |
| hostname | print hostname (computer name) | hostname |
| who | display list of user(s) on the system | who |
| ssh | opens OpenSSH remote login app | ssh [yourDuckID]@login2.talapas.uoregon.edu |
| scp [source] [dest] | copy files from source to dest over ssh | scp [duckID]@login2.talapas.uoregon:~/output.zip . |
| [cmd1] | [cmd2] | pipe output of cmd1 to cmd2 | history | grep `ls’ |
| unzip [zip folder] | unzip zipped folder | unzip example.zip |
| chmod [permissions] [file or folder] | give permissions to users or groups for file | chmod -R g+rwx ShareInputs |
| sort [file] | sort lines within a file or input buffer | sort -n ids.txt |
| head -n [# lines] [file] | print the first n lines of a file or files | head -n long-novel.txt |
| tail -n [# lines] [file] | print the last n lines of a file or files | tail -n long-novel.txt |
| echo [string] | print textual input to terminal | echo “echo echo echo” |
| [cmd] > [file] | redirect output of [cmd] to file | echo “Hello” > file.txt |
| [cmd] » [file] | concatenate redirected output of [cmd] to file | echo “Another Line” » file.txt |
| history | show command line history | history |
| grep [pattern] [file or files] | find instances of pattern in file | grep -r ‘assignment’ . |
Learn More
- Linux file permissions explained, Scott McBrien.
- A short article and video tutorial that explains RedHat Linux permissions in detail. While the group permissions enabled by the PIRG model a little more complicated than the structure outlined here, the rest of the lesson is thorough and relevant.